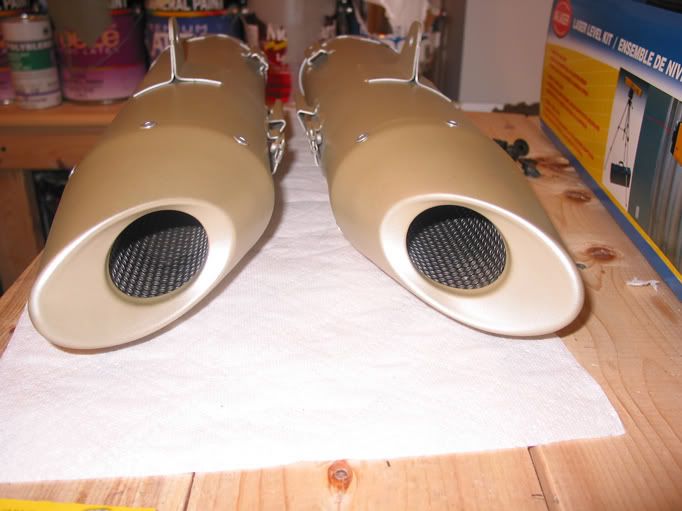
Just installed the A and R race baffles and punched out the cat. Holy Sh*t. Sounds incredible. May even be too much. Nice deep idle is what I like the best...

26,113 posts
·
Joined 2003
I finally broke down and ordered mine yesterday, I will be running it with a gutted cat that I bought from another member. I was tired on waiting for the y pipes to come available and I do like the look of the whole stock set up. I also have an order coming from McCoy's with the Custom LED Complete rear light with integrated signals and some front flushies. It is about time I get modding this thing :rant
26,113 posts
·
Joined 2003
Thanks Bogie, you just supported my decision. How bad is the gurgling and popping unpon deceleration?
26,113 posts
·
Joined 2003
It is my understanding that the smog block offs will elminate most the of problem and then a PCIII will clear up the rest. Is this basically how you see it?
52,665 posts
·
Joined 2003
Yup. :thumbup
I would say 85 to 90% is eliminated by the block offs and when I get a PCIII it should be really smooth then. :fact
I would say 85 to 90% is eliminated by the block offs and when I get a PCIII it should be really smooth then. :fact
702 posts
·
Joined 2007
Plan on doing mine this winter. If anyone has good instructions on installing the smog plates please let me know. Wheatmans pictures are all down in the other how-to.
271 posts
·
Joined 2006
truly some good money spent. and with the pcIII you get nice smooth power with no popping. 
296 posts
·
Joined 2006
I have an 02' R1. I installed a A&R baffle also. I love the sound by the way! Should I get the PCIII also? I know the idle isn't steady. I am planning on buying a K&N air filter also. I checked the dynojet website, and the maps are either stock exhaust or brand specific. What Map did you guys use for the A& R baffles? What else should I do? or can I do? Thanks in Advance!!!!
2,051 posts
·
Joined 2007
Yup they are great man! i kept my cat but i cut the pipes 4 1/2 inches. Loud!!
8,519 posts
·
Joined 2006
i was going to pay a lot of $$$$$ for a full system and PCIII. But I can't wait to do this mod. with the race baffles and gutting the cat. thanks again for the info, this forum is the deal.
i'm going to dyno stock and then afterwards when the tuner does a map, I'll post some charts here one day.
i'm going to dyno stock and then afterwards when the tuner does a map, I'll post some charts here one day.
227 posts
·
Joined 2006
A tip not in the instructions for anyone doing the baffles. Put the seam at the top.
![Image]()

26,113 posts
·
Joined 2003
I am getting ready to do this in the next couple of days. I assume you are speaking of the seam in the baffle and it's orientation to the top of the can. :dunno How does this tip help :dunnoA tip not in the instructions for anyone doing the baffles. Put the seam at the top.
![Image]()
227 posts
·
Joined 2006
Yes, its for looks, the seam will show if on the bottom. You may not care but you would have to rip open the cans and swap the baffles side to side to correct. Test fit when you get them, they work one of two ways, seam up or seam down. Might as well do seam up. This is not mentioned in the instructions. Here are mine with seam up, not visible.
![Image]()

26,113 posts
·
Joined 2003
Got it :yesnod thanks for the advice ... something like that would have driven me nuts after the fact :rant
26,113 posts
·
Joined 2003
:rant No Bogie it is called doing it right the first time :rant
and maybe a little OCD :lol
and maybe a little OCD :lol
52,665 posts
·
Joined 2003
Just given ya sheet brutha!! :lol :lol:rant No Bogie it is called doing it right the first time :rant
and maybe a little OCD :lol
I'd have to look at mine to see whether or not they are that way but to be honest with ya I think after a bit of running they get covered in a little carbon and you can't tell. :thumbup
227 posts
·
Joined 2006
Ride it for a while to see if it corrects, if not I think you can adjust the idle on an 06.
http://www.r1-forum.com/forums/showthread.php?t=153587&highlight=hugh+idle
I added extra packing to each can. so, re-use the stock stuff and added 2 packs of V&H per can. I did not want it too loud and there is alot of room left in the can with only 1 pack. I haven't installed the exhaust yet, so I can't comment on the sound.
Its 50/50 whether Bogie got the baffles in upside down.
845 posts
·
Joined 2006
something ive always wondered about using that knob to adjust the idle. it looks like the cable goes to the fuel pressure regulator. so if you adjusted that wouldnt that give it more or less fuel everywhere?i could be way off here...just figured id ask.
26,113 posts
·
Joined 2003
Well I started taking the cans apart tonight ..... that is a lot of fun. I am still on the weld removal / beat the hell out of the old inner. Does anyone have any advice for this part :rant
52,665 posts
·
Joined 2003
Make sure when your holding the exhaust your not squeezing the cans to much ass your adding resistance to you efforts. :thumbup
Try have someone hold the back of the exhaust for you so your not squeezing the cans. :fact
Try have someone hold the back of the exhaust for you so your not squeezing the cans. :fact
227 posts
·
Joined 2006
I used a drill for the welds. These welds can be larger than you think. Here is the trick. Look around the welds to make sure they are cracked-the two pieces are separated, all the way around the hole where the two pieces were welded. you should see a fine separation. If not, you have a weld still hanging on. You an use an awl or a screwdriver in the rivet hole to pry - Sometimes you can hear the weld crack when it releases. The key is to make sure that the welds have completely released. A whack on the exhaust tip may aslo release them, but if it is stubborn then you must have a sticky weld that needs to drilled out more. Once all the welds are broken the stock baffle will come out easy.
The first can that I did I beat the hell out of it also and it wouldn't budge. So, I checked each weld carefully and found that two hadn't released. Once I got those to give up the can came out easy.
The first can that I did I beat the hell out of it also and it wouldn't budge. So, I checked each weld carefully and found that two hadn't released. Once I got those to give up the can came out easy.
26,113 posts
·
Joined 2003
03 tem, that is exactly where I am at, I have seams 2 seams out of the 4 welds on both cans. I think I need to work at them a bit more. I assumed I could break the last bit loose with a hammer, but that is a no go :lol I have been using a combination of drill and grinder.
Thanks Bogie I will keep that in mind. The wife after hearing my cursing screaming and multiple power tools, compressor etc, asked if the local dealer had cans in stock, cause it seemed like it would be easier to just pick up aftermarket cans. I first wanted to kiss her, than strangle her :lol I did however call this morning and our local dealer has no stock on aftermarket cans :sneaky :lol
Thanks Bogie I will keep that in mind. The wife after hearing my cursing screaming and multiple power tools, compressor etc, asked if the local dealer had cans in stock, cause it seemed like it would be easier to just pick up aftermarket cans. I first wanted to kiss her, than strangle her :lol I did however call this morning and our local dealer has no stock on aftermarket cans :sneaky :lol
1,128 posts
·
Joined 2007
:lol :lol I laugh because I will be doing mine within the next few weeks and I can see me now...:rant ....substitute horse for cans:horse: :banghead: :cryin ...and wife going...:no...why won't he just leave brand new stuff alone....
227 posts
·
Joined 2006
Funny, my wife was giving me the gears when I was smashing the stock baffle with a small sledgehammer. :hammer:
"Why do you have to go and change things, isn't it good enough"
They just don't understand.
"Why do you have to go and change things, isn't it good enough"
They just don't understand.
52,665 posts
·
Joined 2003
:fact :lol :lolFunny, my wife was giving me the gears when I was smashing the stock baffle with a small sledgehammer. :hammer:
"Why do you have to go and change things, isn't it good enough"
They just don't understand.
845 posts
·
Joined 2006
a typical die grinder bit is the perfect diameter to take out all the weld. i just made like a half moon grind on all the welds and the thing came apart very easily.
296 posts
·
Joined 2006
I get the same speech, "It looks fine, your doing to much." "Why can't you leave things the way they are?" And I have only made small changes to my bike. Women.
845 posts
·
Joined 2006
what i say...stops em dead in their tracks..."why cant you just leave the house alone?"
-
?
-
?
-
?
-
?
-
?
-
?
-
?
-
?
-
?
-
?
-
?
-
?
-
?
-
?
-
?
-
?
-
?
-
?
-
?
-
?
- posts
- 6M
- members
- 162K
- Since
- 2001
R1-Forum is a Yamaha R1 motorcycle enthusiasts community dedicated to Yamaha YZF 1000 R1 sportbike. Discuss performance, customization, specs, reviews and more!
Top Contributors this Month
View All
Jimmy boy
30 Replies
bacchus40
22 Replies
chrisr1gray2016
14 Replies


