so i figure there are a bunch of exhaust install threads, and its really pretty straightforward, so that much of this is just documentation, but where i did some finagling, was the heat shield, it had no bracket and its going to aftermarket rear sets, so anyone else in my position might benefit from this.
as with any mechanical endeavor safety is a must, i make no claims of nor take any personal responsibility for your actions and attempts at this; further more i will not be held liable in the event of injury or death. (legalese) really though just don't be a dummy, use the proper eye protection, use PPE and don't get hurt, i like most of you guys and i would feel bad.
tear down(pretty straight forward)
take off the pass. seat and your seat, two bolts and your key
![Image]()
there are a couple of lil Phillips head push clips to negotiate up top, a couple Allen head ones too and on the lower side of the rear fairing two push button clippy things to move also.
![Image]()
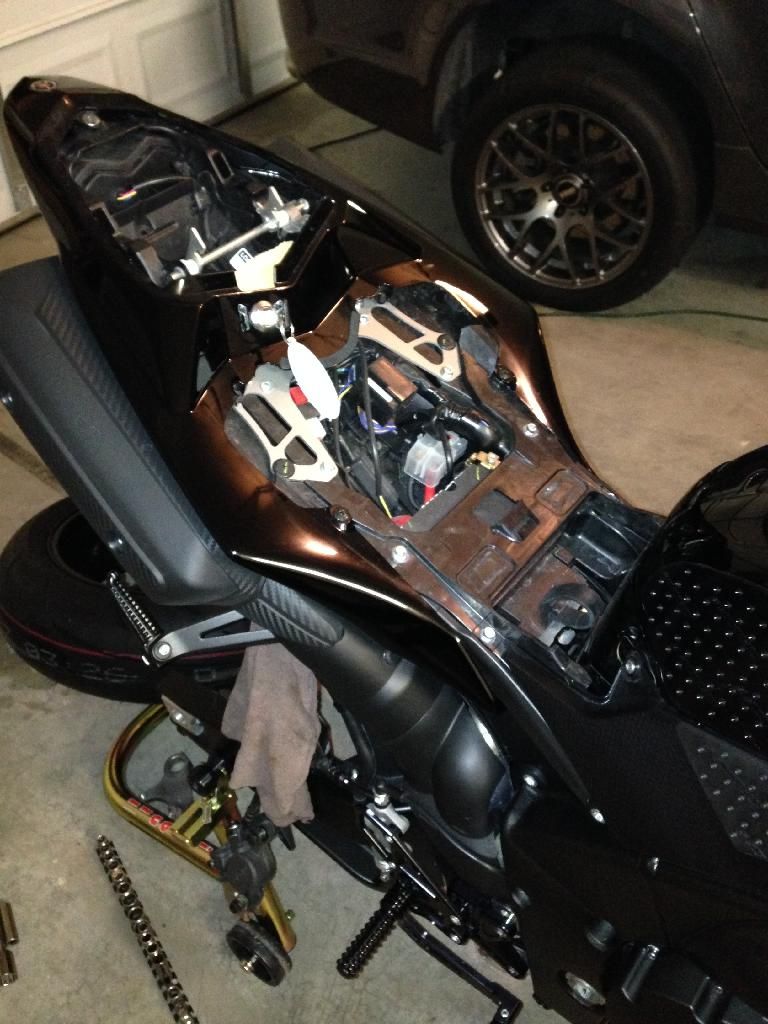
the rear fairing basically slides off, go slow with this, there are slotted tabs that the plastic rests in, and if you are fast or jerky you can damage them, take a lil time and it'll come off.
i skipped some steps in the picture but as far as the cans removal (again straight forward) its two 12 or 13mm bolts up top(i forget which) and two clamps on the pipes going to the merge... then just finagle it some, going slow to not scratch your passenger peg brackets or the lower rear fairing.
![Image]()
pardon the mess, i rode it the other day and there is still salt on the ground, a quick hose off didn't quite do all i wanted it to. worth mentioning now would be a good time to clean your under tail
removal of the cat pipe requires the rearsets to be moved, i zip tied mine out of the way, i have Vortex Rearsets (more on that later) so i have the pressure switch to work around for the brake light... i took the length out as best i could without stressing it.
![Image]()
![Image]()
as you can see from where my ratchet is you have to remove the bracket for the cat pipe, and than move under it and undo the clamp, lastly remove the o2, if you aren't tuning it out save it, if not you can trace the wire back under the tank and remove the clip. (mine was lifted for other installs i'm doing at the same time) then its just a matter of working it out of there, again go slow as to not scratch anything or damage the gasket from the headpipe.
![Image]()
isn't that gorgeous?! I'm not reusing my o2 so i pulled that and capped the bung. I transferred the bracket from the factory cat pipe and it went together pretty easy again take your time not to damage the gasket as you're setting it on there, i loosely fitted the bracket and put that bolt back in a few threads.
![Image]()
at this point i had already installed everything else but i wanted to show this pic since it has that bracket transferred; i saved the clamp at the bottom for toward the end after i fitted the new cans. after everything is aligned go in and tighten it down.
might as well get to that now
![Image]()
line up the pipes, since its the system i can just spring clip one pipe to the other and I'm golden but if you're using factory pieces for either end use their lil clamp things. for the springs i am just careful with the needlenose pliers, then just tighten it all down and marvel at the beauty
as with any mechanical endeavor safety is a must, i make no claims of nor take any personal responsibility for your actions and attempts at this; further more i will not be held liable in the event of injury or death. (legalese) really though just don't be a dummy, use the proper eye protection, use PPE and don't get hurt, i like most of you guys and i would feel bad.
tear down(pretty straight forward)
take off the pass. seat and your seat, two bolts and your key
there are a couple of lil Phillips head push clips to negotiate up top, a couple Allen head ones too and on the lower side of the rear fairing two push button clippy things to move also.

the rear fairing basically slides off, go slow with this, there are slotted tabs that the plastic rests in, and if you are fast or jerky you can damage them, take a lil time and it'll come off.
i skipped some steps in the picture but as far as the cans removal (again straight forward) its two 12 or 13mm bolts up top(i forget which) and two clamps on the pipes going to the merge... then just finagle it some, going slow to not scratch your passenger peg brackets or the lower rear fairing.

pardon the mess, i rode it the other day and there is still salt on the ground, a quick hose off didn't quite do all i wanted it to. worth mentioning now would be a good time to clean your under tail
removal of the cat pipe requires the rearsets to be moved, i zip tied mine out of the way, i have Vortex Rearsets (more on that later) so i have the pressure switch to work around for the brake light... i took the length out as best i could without stressing it.


as you can see from where my ratchet is you have to remove the bracket for the cat pipe, and than move under it and undo the clamp, lastly remove the o2, if you aren't tuning it out save it, if not you can trace the wire back under the tank and remove the clip. (mine was lifted for other installs i'm doing at the same time) then its just a matter of working it out of there, again go slow as to not scratch anything or damage the gasket from the headpipe.

isn't that gorgeous?! I'm not reusing my o2 so i pulled that and capped the bung. I transferred the bracket from the factory cat pipe and it went together pretty easy again take your time not to damage the gasket as you're setting it on there, i loosely fitted the bracket and put that bolt back in a few threads.

at this point i had already installed everything else but i wanted to show this pic since it has that bracket transferred; i saved the clamp at the bottom for toward the end after i fitted the new cans. after everything is aligned go in and tighten it down.
might as well get to that now

line up the pipes, since its the system i can just spring clip one pipe to the other and I'm golden but if you're using factory pieces for either end use their lil clamp things. for the springs i am just careful with the needlenose pliers, then just tighten it all down and marvel at the beauty